Saturday, February 8, 2014

Changing engine and gearbox oils in Fiat Uno

It was time to do some basic maintenance things, engine oil change and gearbox oil change.
Here is the stuff used:


I used cheap 10w-40 semisynthetic motor oil. Modern oils have higher API-classes than were recommended at time when this Uno was constructed so I decided that basic semisynth is enough with API-class SL. Uno manual recommends SG-class (class added in 1989) which is now obsolete so this oil even though semisynth and by far not the best around is still better than were used in nineties. English language Wikipedia page has some good info about motor oil. Besides oil, new stock oil filter was bought. Also in pic (right) is the manual pump to add new gearbox oil.

Changing motor oil is really easy in Uno; there's not any plastic plates to remove so it's just unscrewing the bolt and hoping that oil hits the bowl in the floor. Here are tools used and old oil filter:


Uno's manual recommends oil change at every 10 000 km or once a year, service book recommends 15 000 km/once a year and repair guide gives the interval in 10 000km or half a year. This is a old engine and to save it as much as possible frequent oil changes would be good. But in the other hand this Uno won't do that much kilometers a year, so once a year I guess is mandatory and twice a year may be a bit too often. But we'll see.

GEARBOX OIL CHANGE
After engine oil was changed it was time to move on to gearbox oil. That was a bit harder. Well the "hard part" was that the draining bolt was where it should not have been at least according to guides.. Car manual shows the pictures of a older type of transmission and repair guide has pictures of yet another type of transmission. But this 1993 Uno has same 5-speed gearbox C.514 that were used in Punto and probably in at least some Bravo/Brava -models. To my knowledge C.514 was used in Uno's from year 1993 on (among others). So the draining bolt is facing rear and quite far back. Here's couple of pics:
Fiat Uno 1993 gearbox oil draining bolt location
Pic from rear to front showing gearbox oil draining bolt. Also in pic engine oil draining bolt on right.


As you can see from the upper pic there has been some leaks between gearbox and engine. Not much to do but to watch if it gets worse and then consider a bigger repair. But back to oil change. We used SAE 80W-90 API GL-4 transmission oil, this time API -class was same as the original recommendation (believe it or not but manual here is actually quite hard to understand and taking account that this has a Punto's gearbox so manual don't give exact guidance). Uno's manual states the change interval in 60 000 kilometers and Uno's service manual says 120 000km's. This is typical Fiat. Another example is fuel tank size, in the beginning of manual it says 42 litres and in the end manual gives the size of 38 litres.. I checked Punto mk1's gearbox oil recommendation and it is SAE80w GL-4 (with a change interval 120 000km's) Anyway it was about time to do this oil change, at least oil smelled bad and was very dark.

In gearbox oils you normally have to use some kind of pump to get new oil in. Front side of gearbox is a filling hole and oil level should be in a same level as holes lowest point. Here's a pic of adding new oil:
Oil to gearbox.
And there you go! These are easy to do when you can lift the car so you can work from under the car standing. While Uno was up we decided to spray some zinc-spray to fuel tank and exhaust. Fuel tank is metallic in Uno's and they are known to start leaking eventually. Goal here is to extend life of these parts, zinc is very good at stopping rust and corrosion. Or maybe I should say "slowing" instead of "stopping". Anyway, here's the picture of treated fuel tank and last muffler on exhaust. Especially muffler joints are prone to wear so we'll see how long this lasts. If you are interested about how zinc works with steel I recommend to check the "Zinc coatings -how they work" from the International zinc association.

Sunday, September 8, 2013

Fiat Uno new tires and summer things


I managed to contact the second owner of this Uno. He owned the car from the 1998 til 2012. After the head gasket broke he sold it to the guy who fixed it and sold it to me. Strange find was that during the first years this Uno didn't saw much action. in year 1999, according to service history, it had only a bit over 20 000 km, that averages a bit over 3 000 km's a year. That's a pretty sure sign that the first owner was an eldelry man.


The summer tires that came with this Uno were eleven years old Nokian NRT2 155/80 and pretty much worn out. I was planning to buy brand new tires because at the original size, which is 155/70 R13, they are not that expensive. From the local fiat -enthusiasts forum www.fiatforum.fi I happened to find what I think was a good bargain. A fellow was selling hardly used Yokohama a.drive -tires 155/70 R13 with the original Fiat Punto mk1 alloy wheels. I bought them straight away. Here's a pic of them installed to Fiat Uno.
Uno with Punto alloys

 It's been nice driving this Uno in the summer although it's pretty hot inside. Even when the rear windows are open. I also like the apt gear ratios in this 5-gear transmission, although second gear isn't that easy to engage..

Fiat Uno 1.1 i.e


Left rear door handle was broken like this when I bought this car:


I thought it is easy to replace, but the hard part was to find a replacement handle! It became clear that most of the Unos here has been 3-door models so the rear handles were in short supply. I finally managed to find one from the scrap yard in a not so bad price.
Fiat Uno rear door handle

To change the outer handle first you have to take out the interior handle which is attached with three screws, one on top and two under the handle.
Fiat Uno rear interior handle

 I decided just to part the interior panel a bit to get access to two handle fastening nuts.

Fiat Uno rear interior panel
Sadly the door metal was a bit bent, I tried to straighten it up just by gently pulling it  and it came pretty good. It needs some paint, as well as couple of other points in this Uno, so I think my next investment may very well be a paint spray with a Bleu Abisso -color..

Fiat Uno rear door handle holes, shown before straightening.

Tuesday, April 30, 2013

Fiat Uno getting ready for summer - passed the MOT and idling problems gone

Local vocational school was a neat find to do some repairs to this little Fiat! Although it took a couple of weeks but the cost was very low and I actually left with a feeling that they really did the job properly. So what was done? The main thing was to solve the emissions problem. It was easily noticeable that something was not right because of quite large amounts of exhaust smoke. After checking the cylinder pressures (they were ok) the culprit was found to be incorrect ignition timing which was checked with a stroboscope. Correct ignition timing also solved those idling problems.

Students in vocational school took the Uno in a yearly inspection for me (same price that I would have paid) and it got passed, so there's over a year of time to do some (hopefully) joyful riding.

Old battery was a bit shady and impossible to mount properly in place. So a new battery manufactured by a polish company called Zap was installed. It is this Silver one.
Fiat Uno - new Zap 53ah battery installed.
Fiat actually recommended to use 30ah batteries with this kind of Uno (EDIT: this information was from the Haynes manual, original Battery capacity at least here is 45ah), but it is appropriate to use a bit stronger battery here where the winters are really cold and the summers, well, not so cold.

While taking picture of a battery I checked the engine oil level which was like that:
Fiat Uno oil dipstick
So the oil level is a bit low. Sadly, I forgot what the oil level was in the last month when I checked it. But there's now a bit of a suspicion that this Fire engine is consuming oil. I'll add it up and check it regularly from now on.

It's been still quite winterish here but it was time to do some leisure-driving with Uno. It is working well for now.


Sunday, March 24, 2013

Solving idling problems Part 2

Well, the final diagnosis was that one of the spark plug was broken and shot current to fuel ignition which couldn't return fuel as it should. The reasons for these was that I assembled the fuel return part wrongly and because the car's previous owner had tightened the spark plugs way too tight and therefore one had a crack.
So there was extra fuel on ignition which caught an unfortunate spark from the spark plug. I had previously tried to check the plugs but they were too tight to open. Mechanic told me that he used one meter-length extension arm to loosen the plugs.
Faulty spark plug was the main reason for a twitchy ride. I also replaced the broken vacuum advance unit.

Fiat Uno vacuum advance unit. New one on the right...

But after all this, Fiat still experienced idling problems. The culprit seems to be sometimes working idle control unit. Problem is now evaded by adjusting the idle speed a bit higher than normal. That's done by limiting the movement area of the ignition end of the throttle cable. New replacement idle control unit costs about 100 euros and there are plans to replace it as well.

But after these little experiences this Fiat Uno is working actually quite well! Here's the pic where you can see the current state of the car. Well, it's been washed after this picture was taken.

Fiat Uno 1.1. i.e. S


Sunday, February 24, 2013

Fiat Uno idling problems solved in a quite dramatic way part 1

It was time to look a bit more spesifically what might have caused the idling problems and occasional twitching during driving. After removing the air filter box on top of the engine the single point injection is easily accessible. This feels a bit like an old carburetor actually. I've noticed that injection unit was dirty from here and there and decided to clean it a bit.


Fiat Uno Bosch Spi
 It was quite easy to take off. The hardest part was actually to remove the ignition wire. Here's another pic of ignition system:
Bosch Single-point-injection disassembled
The fuel return part I actually didn't manage to open at first. After I continued this operation on a another day it had disassembled itself by the spring that's inside of it. (Above pic that's already removed.) I didn't saw what was the original order of the parts on a fuel return thing so I had to put them by what I thought in a most logical way. Here I made a mistake but we'll get on that later.

After assembling all the parts back and putting ignition unit back in place it was time to try how it works. Well not good. Car didn't start but instead it caught fire. It's a pretty uncanny feeling when you notice the flames coming from the engine compartment. The fire was below the air filter box and I tried to extinguish it by snow (it's pretty snowy here in north at this time of year) but it was real hard. The firemen came and extinguished it absolutely in a proper way, this was an act of assurance because the car was located at that time on a first floor in a building full of people.

That fire was quite a bit of a surprise but after examining the car it didn't cause much damage. Part of the air filter box was melted away and air filter got really dirty. I inhaled a bit of fire gases and felt a bit unwell because of that. Well it was time to take this car to auto repair shop to see what went wrong.

Sunday, February 10, 2013

Fiat Uno fuel filter, wiper motor and other minor things

I've done some minor maintenance with Fiat Uno. Like I mentioned last time, there are problems with idling which I decided to start tackling with changing the fuel filter. It is easily changed after depressurising fuel system by taking out fuel pump relay behind the ignition coil (look at the pic below), or fuel pump fuse which is located in the same place (right one on the pic) and then running the engine until it has run out of gas.


Fiat uno fuel-related relays and fuses. Also showing ignition coil on the right

Fuel filter in Fiat uno is located on the other side of the engine compartment and is easily replaceable. Shown here the new one installed and old one installed no more.


After noticing that air intake to cabin is full of old leaves and dirt I decided that proper thing to do would be to clean it. After all Uno's never had any cabin air filters. Here are the view before cleaning:
Old vacuum cleaner was quite handy here

having removed windscreen wiper and plastics beneath it, the wiper motor was also easily accessible:

Fiat Uno wiper motor
It didn't look like a 20-year old so the guess is that it's been replaced. Also note that clever piece of plastic which is tilted upwards on above picture. It's function is to protect the wiper motor. Anyways I still got the feeling that this construction as a whole in Fiat Uno below the windscreen is not really very water-resistant. Well the wiper motor was ok and it was time to assemble the parts back.

After a test drive the idling problem was still there, so we are moving to our next guesses, those being mainly the ignition coil and vacuum advance unit (attached to distributor). I've also been trying to take out the lambda sensor with no luck yet, it's really stuck on exhaust manifold! Someone has forgotten the copper paste...


Thursday, January 31, 2013

Fiat Uno - Rattles in the back

I've decided to write this post in english.
While doing a little test drive with Fiat Uno we noticed rattling noise from the rear right. It was constant while on the move and was not dependent on the surface. After buying the car and driving it to its new home there were quite a lot of different kinds of rattling, mostly coming from the summer-wheels (yes, it's snowy here in the north) bouncing on the boot and on the backseat. After all they are as big as 13"

Well anyways. Shock absorbers felt like working ok when pressing on the corners and everything seemed to be ok on the surface. Taking the right rear wheel out was really much harder than it should have been. I didn't have a proper wrench with a bolt size of 17mm and was forced to use span-length (for our finnish readers, span is "vaaksa") stub-wrench, and the bolts were quite rusty. After taking the bolts off, wheel still sat tight and I had to kick it from under the car to get it off. Are these even the right size of rims?

After taking the wheel off the view was like that:

Fiat Uno right rear shock absorber
Moist in the shock abrsorber is wd-40 water-displacing spray that I used to get the view of connection. (Never actually thought before that wd-40 is a Nasdaq listed company with a market-cap of 831,411,989 USD as of 31. january 2013)

Different view here. Fiat Uno right rear trailing arm on the front, spring on the left, brake drum on the right and fuel hose on the up.

I had a suspicion that the part making the noise could be the upper attachment on the shock absorbers. Still I decided to took shock absorber off and noticed that it was famous Thailand-made KYB. My guess is that it is not the original Fiat Uno shock absorber so we may probably conclude that they have been changed at least once during this Uno's life of 20 years..
Fiat Uno KYB shock absorber
The shock absorber was tested to be fine. I did the test by keeping it on vertical position and fully contracting and extending it several times. It went smooth. After reinstalling the shock absorber I made sure to tighten the upper attachment firmly. It is attached with two nuts and they are easy to operate in a roomy boot (well had to turn backseat a bit, but anyway).
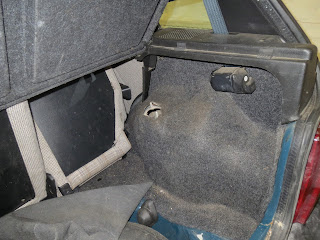
Fiat Uno boot and right rear suspension attachment point.
So then it was time for a test drive and for our delight the rattle was gone. Also gone was idling but we'll leave it for later.